I am under considerable pressure to keep this dry, civil engineering topic positively riveting. I shall do my best.
And if we’re lucky, you will come away with not only a deep appreciation for the lowly concrete frostwall, but also a grasp of how important it is to keep such walls snug and warm.
So let’s first have a peek of what has been accomplished to date.
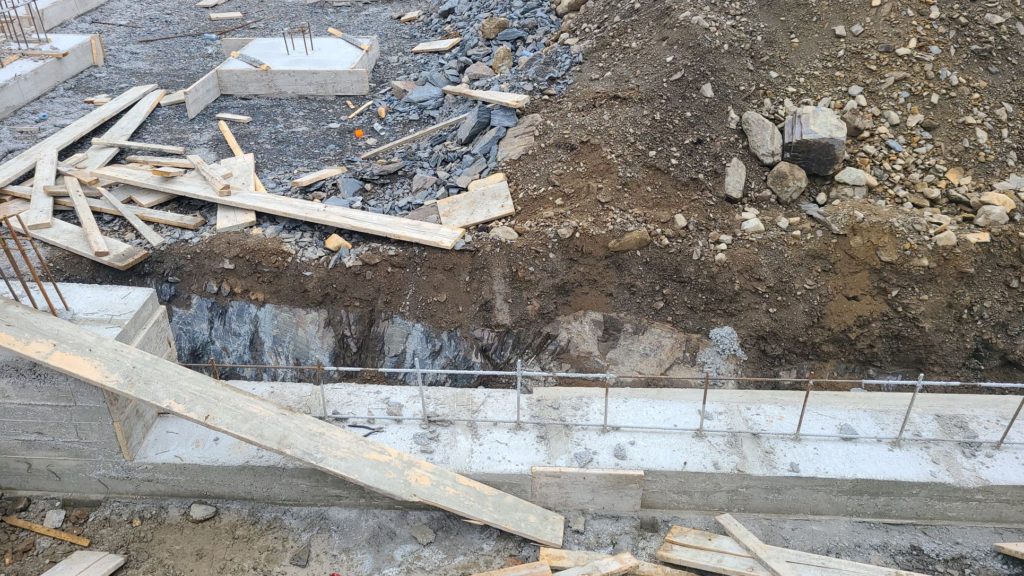
We have completed the concrete footings. The forms have been stripped and finally, it seems, something tangible has been created. The wife casts her eyes over it and exclaims: “Oh my … that looks very small.”
My polite reply: “Well it’s not getting any bloody bigger!”
This may be a hint of things to come. But I digress…
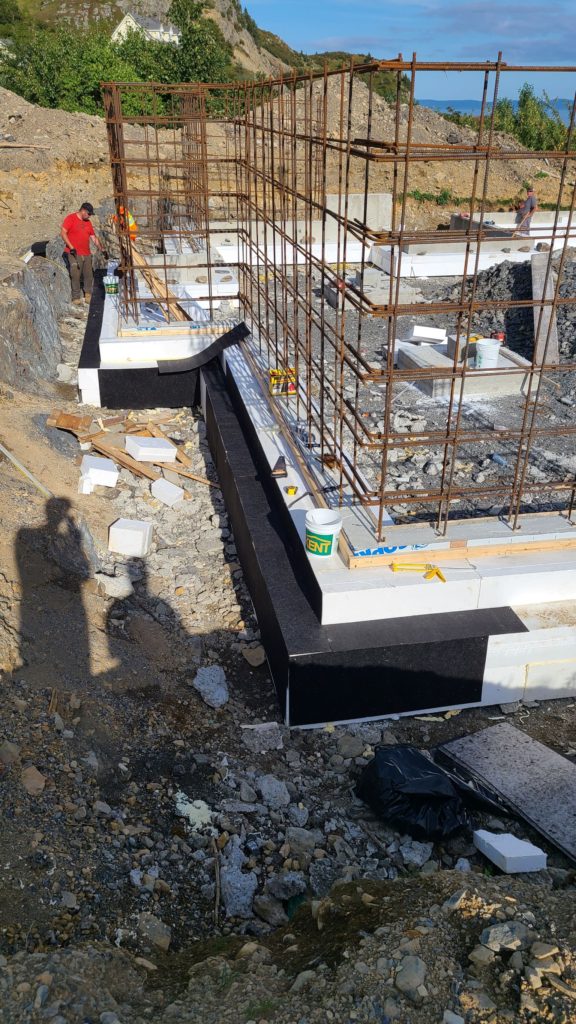
The first thing is to get the rebar guys in to erect the reinforcing steel that will strengthen the north (back) wall. This is essential, as the wall is eleven feet high and will be completely backfilled (like a basement wall in some respects). This is part of the scheme to bury the back portion of the house. I’m just leaving that there in an effort to build suspense.
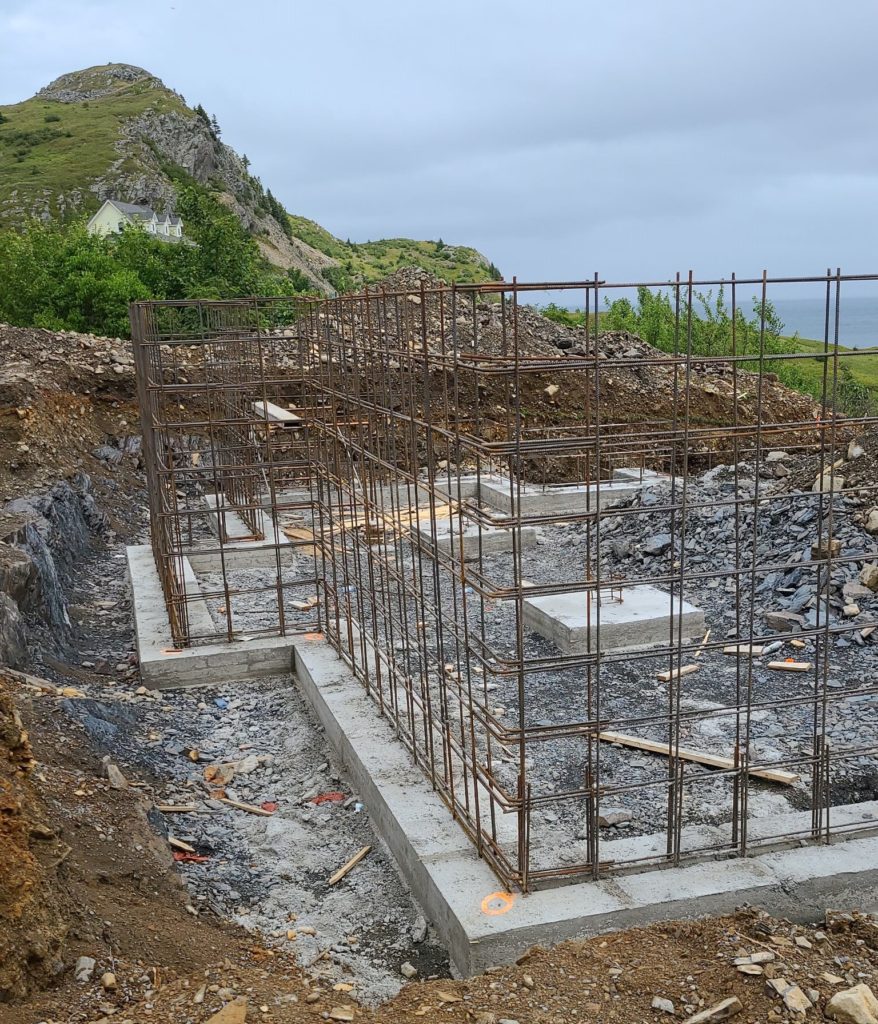
There is also a single line of rebar in the frostwalls around the remainder of the house. These will ultimately be buried, as the floor will be a slab on grade (no basement or crawlspace). They function only to support the exterior walls of the house where most of the structural loads will be carried. The four foot foundation depth is typical (for our climate) and conforms easily to pre-fab reusable forms. This is a specialist sub-contract. The guys have been in and looked at the (monstrous) back wall. Of course they see a problem. The highest standard forms are nine feet. A debate ensues. God forbid we should attempt to do anything non-standard!
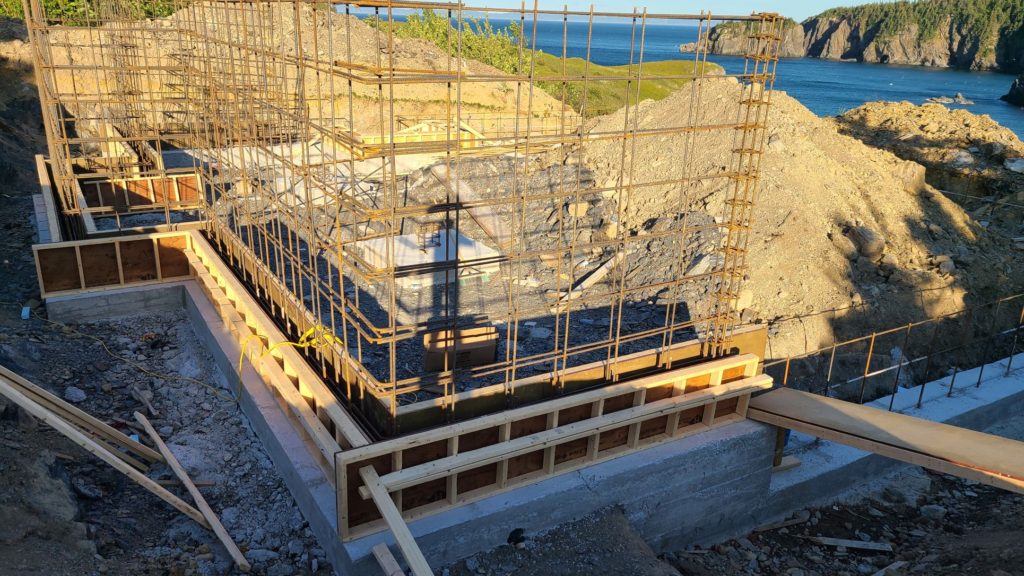
In the end, we decide to craft two separate formwork exercises leading to two separate pours. A two-foot-high concrete pour will be located at the bottom for a host of aesthetic and practical reasons. The remaining nine-foot pour will be on top. This means that the contractor’s forces will erect the formwork for the lower portion, cast the concrete, then insulate the footings and two-foot wall, and backfill it so that the formwork guys won’t have anything to complain about when they erect their nine-foot forms. It all requires patience, coordination and careful attention to detail.
The pumper and concrete trucks return to the site in order to cast the concrete for the two-foot stub wall and the four-foot (typical) frostwalls. It all goes off without a hitch. The following day, all the foundations are stripped and preparations are made to get the formwork guys back as soon as possible to erect the nine-foot walls.


This is what is known in the industry as “trying to get out of the ground” – and it can sometimes be an extremely difficult process as the adage tends to imply.
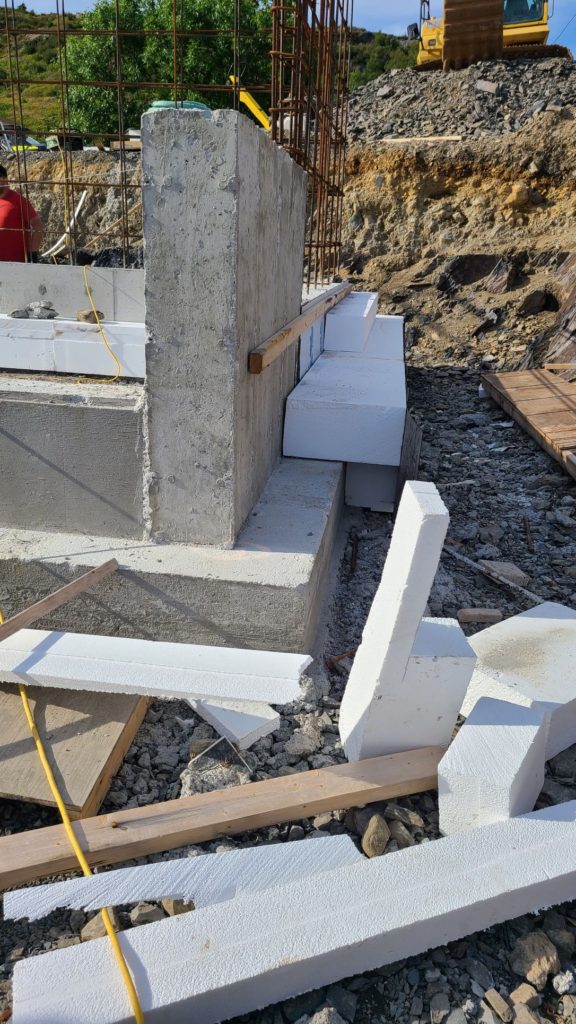
The contractor’s crew immediately set about to waterproof and insulate the two-foot section of the retaining wall that has been cast. They also install weeping tile (perforated pipe drainage) at the base to carry away any water that may accrue after precipitation events. They place protection board against the insulation and bury it. This way the formwork guys will have good footing from which to work.
The formwork crew comes to erect the nine-foot cribs. The contractor’s crew works late into the evening to install all additional forming items for beam pockets, top of wall slope, a reveal to disguise the two separate pours, and so forth. They don’t leave these details to the sub. The following day, the retaining wall is placed (pumper and concrete trucks for the third time). On the following day, the formwork guys strip the foundation and load the cribs back on to their truck. They are finished their work. The pressure is off.

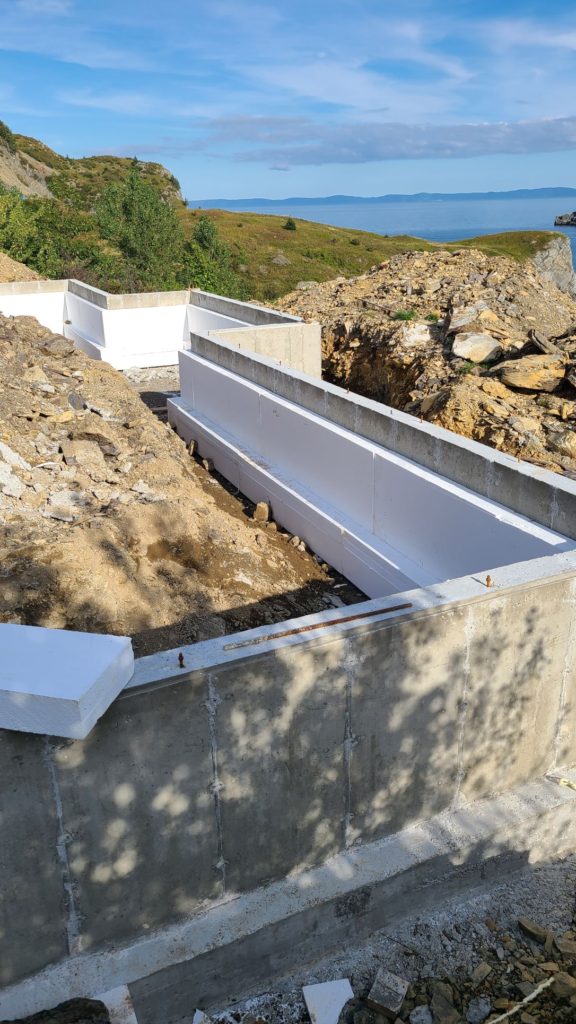
The footings and foundation walls will all be insulated according to Passive House recommendations for this climate. We will use 6 inches of expanded polystyrene on the inside and 8 inches on the outside, R34 and R25 respectively. The slab-on-grade will also feature R25 insulation. This will mitigate thermal transfer to and from the ground beneath the house. It will prevent a cold slab and will also eliminate the tendency for the bedrock below to act as a heat sink when the floor is warmed by radiant energy – the sun and/or the in-floor heating system.


If this seems unusual, you can be forgiven. It is. But the fact is, it shouldn’t be. Basements and foundations have known to be the culprits for about 30% of the heat loss from your home. The fact is widely regarded, yet little is actually done about it. The process of “finishing the basement” is typically taken on by the homeowner long after the contractor has left the site. It is already too late. Your concrete will be forever subject to the vagaries of outside temperature.
I’d also like to point out that the expanded foam insulation we are using is tailor made here in the province. So you are supporting local industry. But please note that the insulation is “Type 3” which is indicative of an extremely high compressive strength. The stuff is made to be buried.
My guys have been in construction all their lives, but have not done this before. It’s slow at first. But soon we figure out efficient and accurate methods to cut the foam and to install it using adhesives and backfill. They get the hang of it and soon, it’s like a piece of art. Any minor gaps are filled with high density spray foam and the end-product is completely continuous.
The retaining wall at the back of the house is treated differently as living spaces are located inside. Therefore the wall is waterproofed with a peel-and-stick membrane, although I have used thermo-fused membranes (applied by melting the bitumen surface with a torch) with great success as well. Insulation is installed on the high retaining wall. A drainage plane will installed before backfilling.
The drainage plane is a dimpled plastic sheet with a screen fabric (provided in rolls). It keeps sand and gravel from the backfill from coming into direct contact with the insulation, thereby ensuring that any moisture that may be present will find clear passage to the bottom of the wall (to the weeping tile) and prevent from entering interior space. I’ll shoe you a detailed picture at a later date.
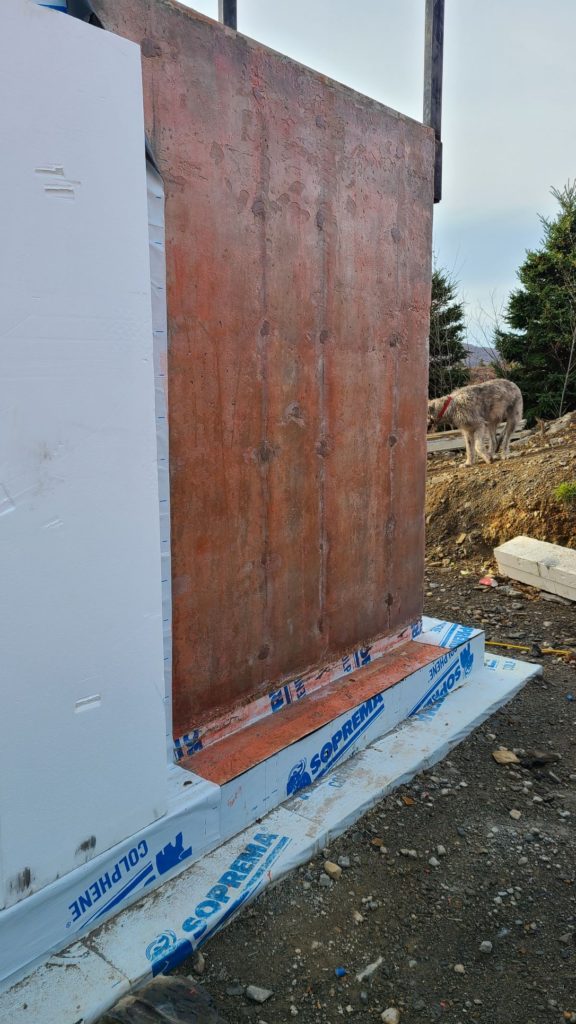
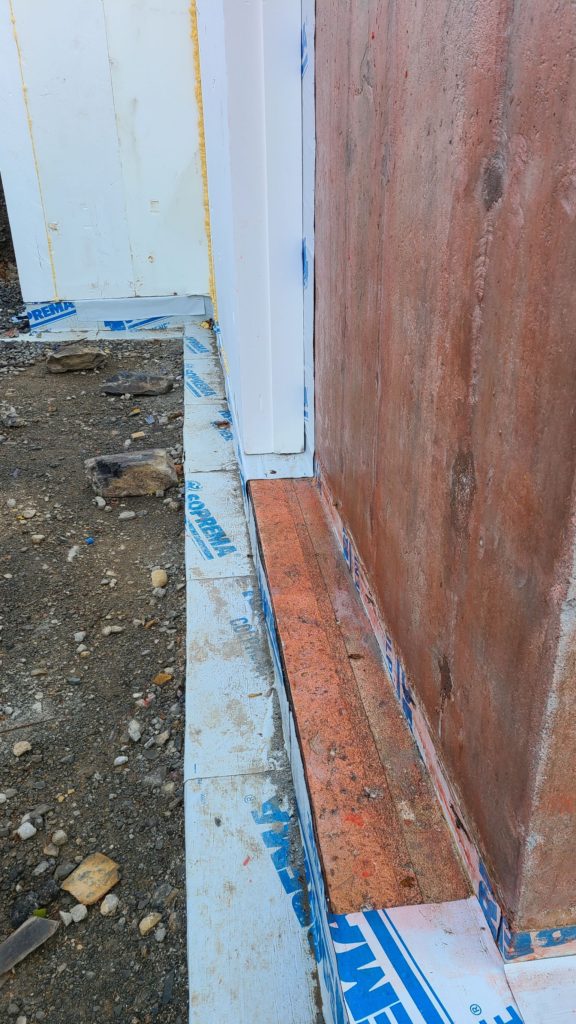
(Oops! I didn’t notice one of the hounds had photo-bombed the left picture! Apologies.)
If you’re wondering what the orange colour is, please allow me explain. Just about all peel & stick membranes come as a two part system. The first part is the primer. Here the manufacturer’s recommended product happens to have an orange cast to it. So please note: If your contractor is installing peel & stick membrane for water-proofing, flashing or air-barrier continuity and has not employed a primer, the effort will likely fail.
There’s perhaps a lot more here than you expected, but I cannot begin to stress how important it is to thoroughly insulate the foundation. It is, in fact, the foundation of a sustainable house.
Taking shape, Jim.
This is good for me to follow – I’m presently studying to become an Energy Advisor (though it’s a completely arse backwards industry to get into, and I’m working without a mentor, which is near impossible when it comes to understanding the modelling in Hot2000, an archaic software that the feds won’t update, even though it’s obvious to all that it needs to happen).
You should note to folks that this is relatively well expensive compared to normal construction – you’ll get it back in energy savings, but not the average guy can build this.
Thanks for sharing – maybe I can evaluate your house when you’re done?
I admire your determination. Government has to show more leadership in this. Relatively more expensive yes – but only if we continue to regard what we are typically doing as “normal”. We need to create the new normal.
Very interesting!
Very interesting! I like the reasons for the process.
We built an out building and brought it down to the level of our house by excavation to put the back wall 8 feet into the ground. We have a staircase up to the second floor and so we built a cold room under the stairs. We insulated it well, so it is cooler than the workshop that fills the rest of the space on the ground floor.
The views and home office space is on the second floor. And the cars are still parked outside!
Many may not yet understand, but insulated concrete, is a thing of beauty.
I never would have guessed, but it actually was riveting!
You always bring a smile!
Really enjoyed the read. Finally a build that is starting off right. We are building an ICF triplex for market.
Damian (Hanlon Realty)
There is a great argument to be made for how multiple housing units are a far better sustainable choice. Our government has no sustainable plan (or backbone) – otherwise they would be supporting sustainable construction for multiple housing. Also, only government intervention would change our position as the worst place in Canada to install PV panels.
I’d love to see your design for a Senior’s Village using this passive process, all on one level with inside parking, both private and communal garden spaces and near the city amenities.
Glad to see someone else building to PH level in the Maritime. Once moved in, you too will enjoy a comfort level not attainable with other build method. Enjoy!
I had another thought/question…
What happens over time to the rigid insulation on exterior of foundation?
After 20 years, is it leaching out? Affecting soil near house in any way? and or breaking down to a point where the soil sinks in ?
I know the LTTR drops over time for interior insulation…
thanks if you know
In my experience, very little happens. I have dug up expanded polystyrene and extruded polystyrene after 30+ years in the ground and did not note any appreciable changes. Not sure what you could expect to be “leaching out”. The LTTR (Long Term Thermal Resistance) of many products has been a issue for many years. It impacts extruded products because they are closed cell and the gases that are in the cells at manufacture do leach out resulting in a lowered R value. Expanded products are not impacted by LTTR. And I have found the Type 3 version of the product (very high density) very resilient to ground pressures. I would refer you to https://www.constructioncanada.net/specifying-eps-as-geofoam/
thanks, will have a look – still learning here, always learning!