In my last post about insulation I indicated that AeroBarrier® technology would be employed to further improve upon the “tightness” of the construction. My friend Steve Thorne at Transfer Energy is the local representative and I recently indicated to him that the exterior envelope was all but complete. He visited the site on a lovely June day, and we were both excited at the prospect of where this sustainable house was situated on the air tightness spectrum.
Air tightness, for me, is one of the four pillars of sustainable construction – along with orientation, insulation, and state-of-the-art mechanical ventilation. It can be however, the most elusive! For despite all the care and attention given to both design and construction, the potential for an unforeseen (leaky) condition always exists. And I think that I may have to acknowledge here at the outset, that the more complex your architectural form is, the greater the likelihood you will encounter air leakage problems.
That is why the Transfer Energy service, in my opinion, is so valuable. First, these problem areas can usually be identified and corrected while the procedure takes place. Secondly, once the major items have been identified and addressed, the AeroBarrier® technology can improve the overall performance by seeking out every compromise in the building envelope, from a pinhole to a ½” gap, and effectively sealing the leak.
But before we get too far into this, let’s take a step back and consider why envelope performance is so vital to new home construction. It’s obvious that if you have a drafty home, achieving a satisfactory thermal comfort level can be challenging. Such a home is far costlier to heat as it uses far more energy. There is a potential for condensation, leading to mould and mildew, which reduces air quality and drives up maintenance routines. It all comes down to the number of air changes per hour your home will experience based on (1) changes in air pressure due to temperature differentials and (2) wind.
Air tight construction offers the potential for lower energy consumption, simplified heating systems, lower maintenance and higher resale potential. Losing one third of your home’s heat through air leakage is clearly problematic, both for the homeowner and the environment.
So how does this work and what happened in my case?
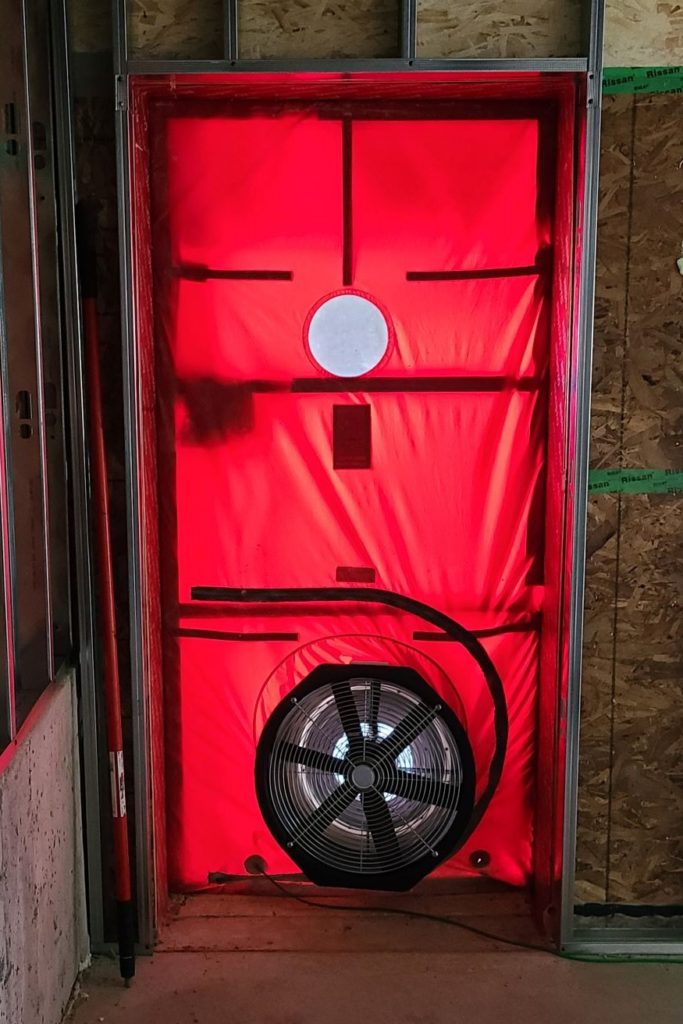
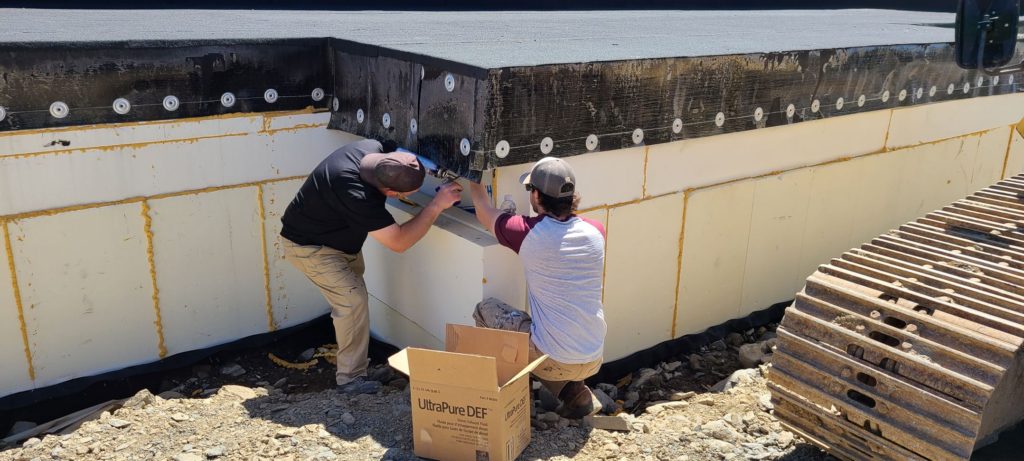
For starters, Steve set up the “blower door” in one of my entries – the one where a damaged door had to be resupplied. We set up in the rough opening of the door with a fabric screen that can be extended to fit the opening. The screen has a large tube penetrating the fabric designed to accept an industrial-type fan. This is how the volume of the house can be pressurized or depressurized.
Before testing, Steve goes through the house to temporarily seal up plumbing, ventilation and electrical penetrations. These are reasonably obvious and my crew have been busy beforehand seeking out and sealing up numerous items. Here we can see sanitary pipes sealed to prevent the escape of air. It is important to discover and address all penetrations otherwise the pressure tests are thrown out of whack.
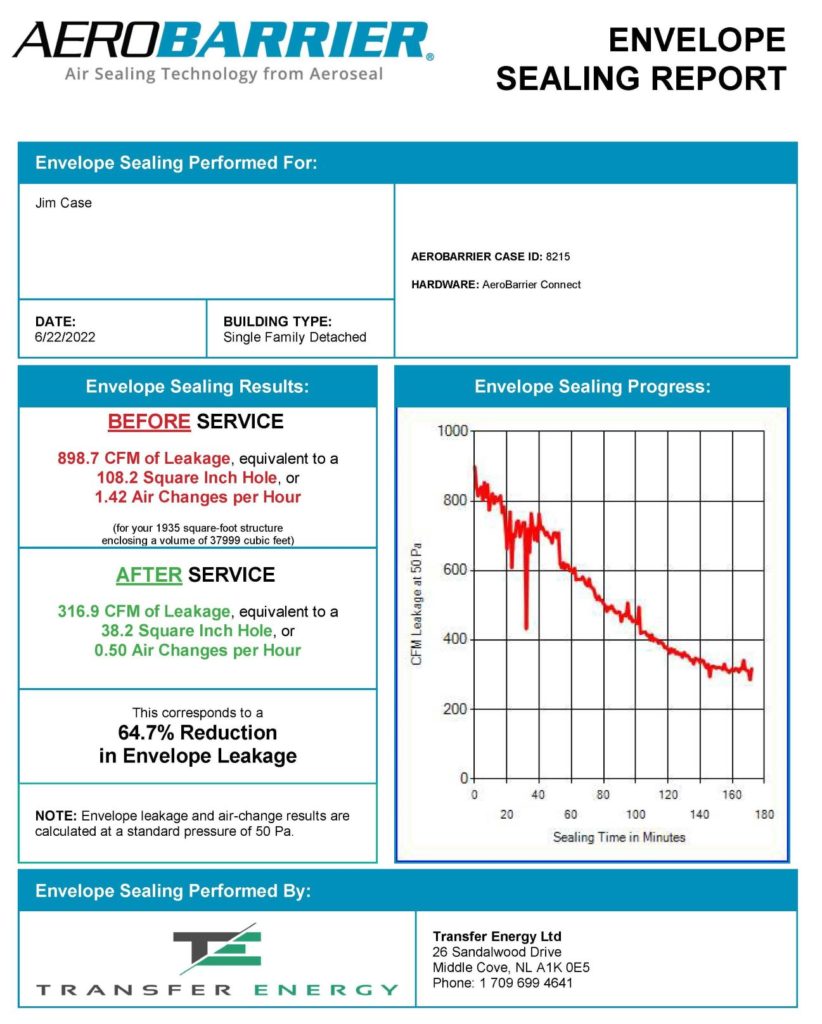
This, of course, is exactly what we encountered. In the initial negative pressure test, we began with air leakage of 917 cubic feet per minute (CFM). We went around and sealed up some of the obvious perpetrators and got down to an initial reading of 899 CFM – or the equivalent of a 108 square inch hole in an otherwise airtight box.
The operator handles on all the windows had not been installed. We taped these over and the rate dropped to 875 CFM. Then a 3” penetration in the concrete retaining wall (for a ground source thermal loop) which we missed was sealed and the rate again dropped to 820 CFM.
Steve reversed the fan to pressurize the house and measured the leakage flow rate again. 860 CFM. I remained horrified. But Steve was very reassuring. All part of a day’s testing. It was time to start the sealing process.
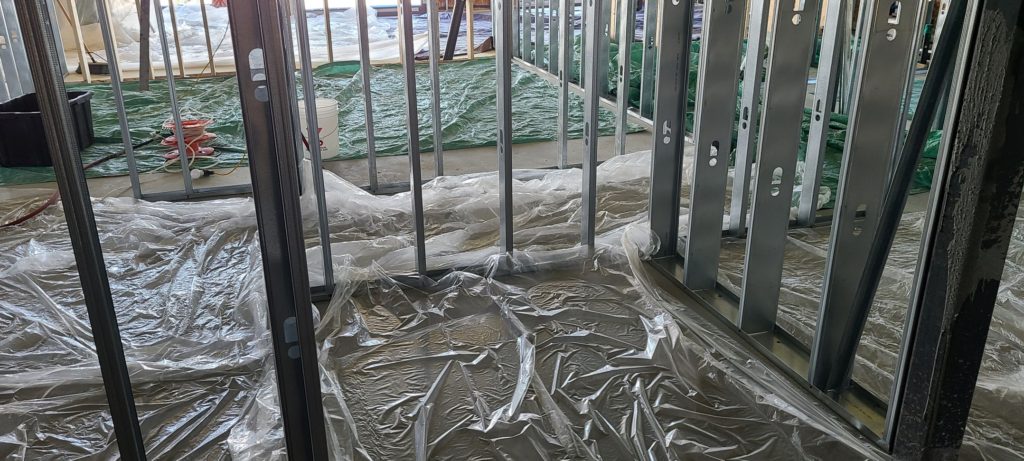
Prior to beginning the aerosol sealing, Steve very fastidiously spread tarpaulins and plastic sheet over all the floors and placed tape on any horizontal finished surfaces (mainly window and door components). This is to prevent the aerosol sealant from collecting and creating a sticky mess. The aerosol will not adhere to vertical surfaces.
Steve hooks up a new fan onto a giant condom that attaches to the blower door. He then places a one-gallon container of liquid latex sealant into two atomizer units located at opposite ends of the house. Each of these black boxes features two aerosol heads that mix and propel the sealant into the air. The product is self-guided to the edges of visible and invisible leaks to create a seal by accumulating across the leak surface. A fog descends.
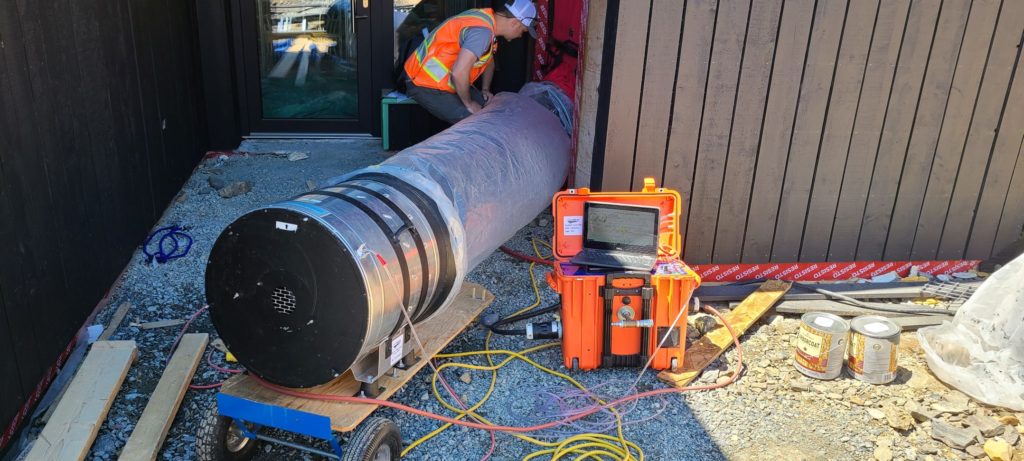
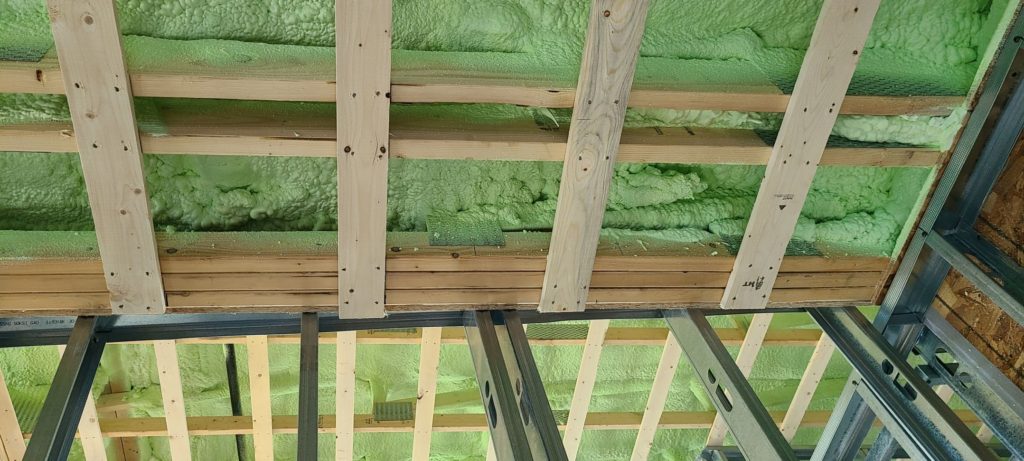
We don our respirators and go inside. Steve uses a flashlight to determine where the product is accumulating. Meanwhile, my crew becomes aware of the aerosol escaping to the exterior in two distinct places. In one, the outboard flute of the steel deck has not been filled with spray foam. The pressure spilling out is akin to a hand dryer in a public washroom. In a second area, we see the vapors spilling out from under the front entrance canopy but cannot source the location of the leak.
Steve shuts down the process from his laptop. My crew address the steel deck issue and we search in vain for the canopy leak. Steve decides to re-enter the house amply supplied with cans of spray foam. He addresses the steel deck / top of concrete wall detail further and eventually discovers that the three-part built-up truss that extends through the back end of the canopy has signs of leakage where the 2×6 bottom chords are laminated together. We could never have predicted that!
Steve tapes the two joints in the bottom of the truss and restarts the procedure.
I am somewhat exasperated that we didn’t do better. Steve talks me down again with that reassuring composure of his. I suspect that he also has a degree in clinical psychology.
We let the process do its job. It takes about another hour.
I am focused on one thing only. The Passive House threshold for certification is 0.6 air changes per hour. Steve holds my hand (figuratively) while the air leakage rate continues to improve. It then plateaus at about the 160 minute mark.
The rate is 0.5 air changes per hour which betters the international Passive House requirement. There are congratulatory high fives all around.
Steve shuts down the process from his laptop and we air out the house. Eventually we get the “all clear” signal to enter. I and my crew are given a full debriefing by Steve which includes the search for places where the AeroBarrier® product has done its job. We are untrained rookies. He certainly is not.
He points up to a beam pocket at the top of the concrete wall. At first we don’t see anything…
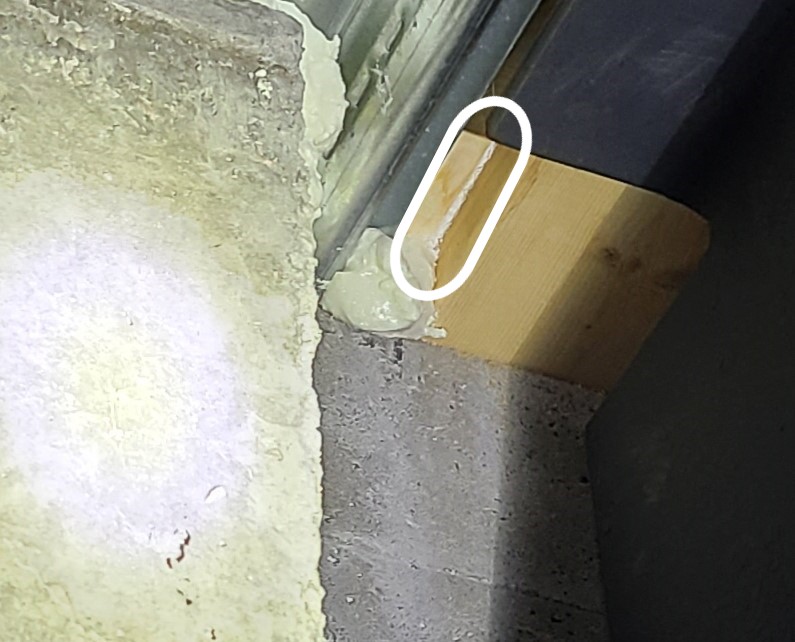
But then on closer inspection, a line of condensed sealant between the top flange of the steel beam and a wood block filler becomes apparent. We are all suitably impressed.
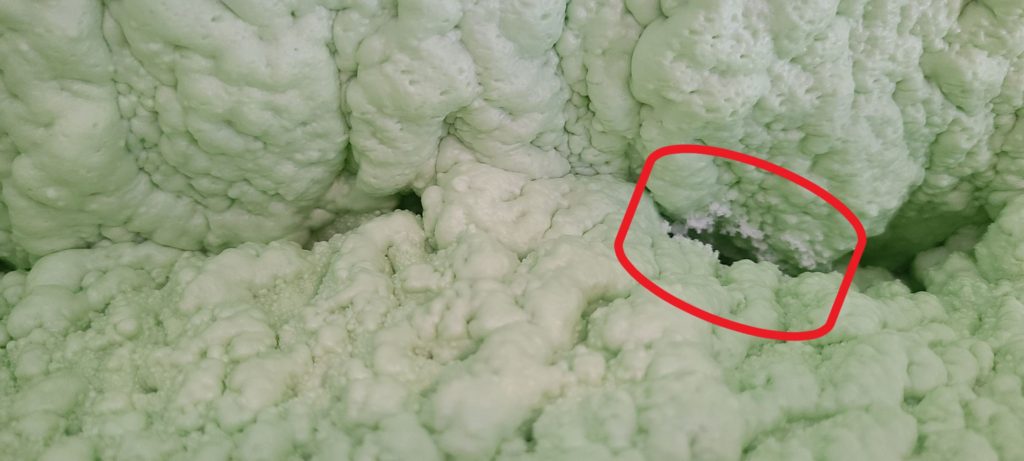
We find another location where the polyurethane roof deck insulation features a crevice. The sealant around the mouth suggests that the crevice, for whatever reason, extends through to the deck.
This hide-and-seek routine reveals numerous such conditions – small leaks that have been addressed. And we all have a very frank and committed discussion as to how we can better the situation knowing all the suspect conditions.
So what did I learn? Well quite simply, I think the main take-home for me was that a simple box design would have been easy. When we introduce aesthetic elements to create “architecture” we need to be all the more vigilant with respect to details. If we had to do it again, we would use ethafoam gaskets at the steel deck / concrete wall interface like we did for the window and door installations (which proved to be very effective). We would have also sealed the built-up trusses as we gang-nailed them together to form the critical structural element.
All 20/20 hindsight.
In the end, our leakage rate was 317 CFM – down from the startup rate of 899 CFM. That’s a 65% reduction in envelope leakage. Was it worth it? You bet it was.
Thanks to Steve Thorne at Transfer Energy and the good folks at AeroBarrier®.
And please bear in mind that this process works well for any new construction. It doesn’t have to approach what we have been doing here with the Sustainable House. Significant improvement can also be made where typical methodologies and materials have been employed if reasonable care and attention has been taken in the construction process.
So in the end, we achieved a tight envelope.
Tighter than a frog’s arse.
Very impressive and detailed process to achieve the certification 0.6 rating.
Guy walks into a bar with a Frog on his head.
Barrtender says: that’s pretty cool , how did you do that ?
The Frog says: would you believe it started out as a wart on my butt?
Thanks for the overview of Aerobarrier! I had recently heard of this and your explanation and pics are great – Thanks to you
enjoy the weather
Jim, thanks for the opportunity to participate in this build! It was a lot of fun working with you, Darryl, and Tyler to help make your home as efficient and comfortable as possible.
Your kind words in this article are very much appreciated.
If anyone is interested to chat about air sealing a new or existing home I can be reached at 1 709 699 4641.