My last post examined concepts in roofing. In this post, I’m going to talk about what we are doing to finish the exterior walls. We will focus on what is being done to keep the elements out (or how we seal the envelope) together with the “look” of the house. I’m also going to introduce you to a few new products. Again, my aim is to elucidate and inspire (and possibly entertain). I have no wish to bog you down with a lot of highly technical ammunition that you may never need to go into battle with.

As those who have been following this blog know, my exterior walls are all sheathed in plywood. What goes on over the plywood is a systems approach, applying what we architects call “The Rainscreen Principle”. This principle is pure Canadian Science, developed by the National Research Council back in the 1960’s. It maintains that the forces that drive rain into a wall system (kinetic energy, capillarity, gravity, air currents, and wind pressure) can all be mitigated or controlled.
“HOW?” is a long and extremely technical lecture. I spent forty years attempting to find the perfect system. I probably don’t have enough years left to explain it to everyone!
But let me put it to you this way. You need a cladding system that screens the rain but does not collect it, a ventilated cavity that allows drying and equalizes air pressure and an air/weather barrier membrane that is impermeable to water but allows vapour transmission. These are the critical elements. And no, that probably doesn’t resemble what you currently have on your house. Don’t ask me why. It’s too hurtful.
The product invented by DuPont has become so ubiquitous that nobody in Newfoundland says “air barrier” – everybody says “dat Tyvek”. The stuff that looks like paper and is stuck together with equally ubiquitous red tape, is actually spun-bonded polyolefin. It’s an economical and readily available product that can do the job, but rarely does because of the way it’s installed. Generally speaking though, it keeps the moisture out.
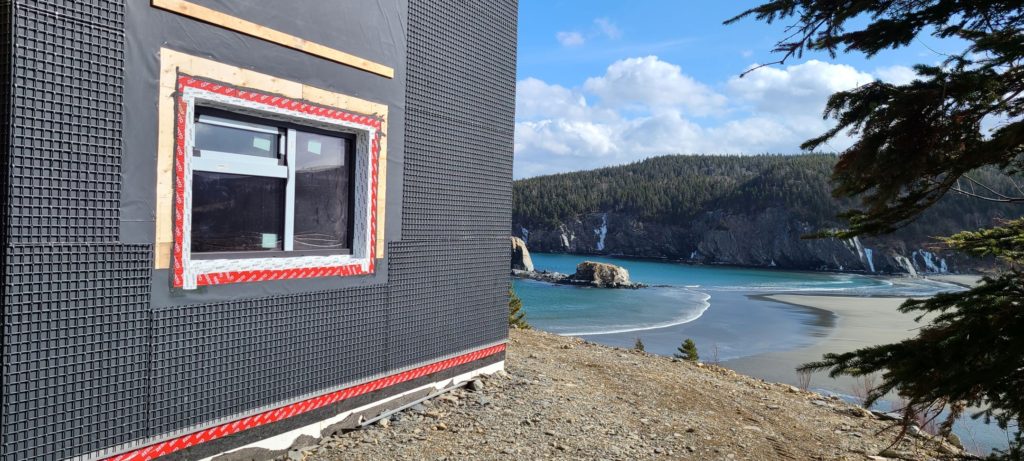
I have opted for a more upscale product that, like Tyvek is breathable, but is self-adhesive as well. Called RevealShield, it too is spun-bonded polyester, but a heavier gauge and with a proprietary coating. It comes in five-foot-wide rolls and is black in colour (which works for me as you will see). The main reason for choosing RevealShield is because the manufacturer indicates that the product will resist ultra-violet degradation when used with open joint system cladding – a critical differentiation. I have used the product in the past with success.
For a deeper dive, I have provided a link:
RevealShield SA Self-Adhered (vaproshield.com)
Am I recommending the product for you? No. I don’t have that kind of liability insurance anymore. But I am comfortable with the risk I have assumed for myself personally. UV exposure on air barrier products has been a contentious issue in the past. Technology is, however, catching up. Time will tell if I have made the right decision…
Using strapping to provide a drainage cavity prior to installing clapboard is another common practice (with promotion through the National Building Code). This is typically 1 x 3” spruce/pine/fir strapping installed vertically at sixteen inches on centre. It’s a good solution, especially when installed over rigid insulative sheathing that provides no nailing substrate.
I have opted for something else, although I have used strapping (with varying degrees of success) for many years. I wanted a product that was sustainable in manufacture, transportation and longevity.
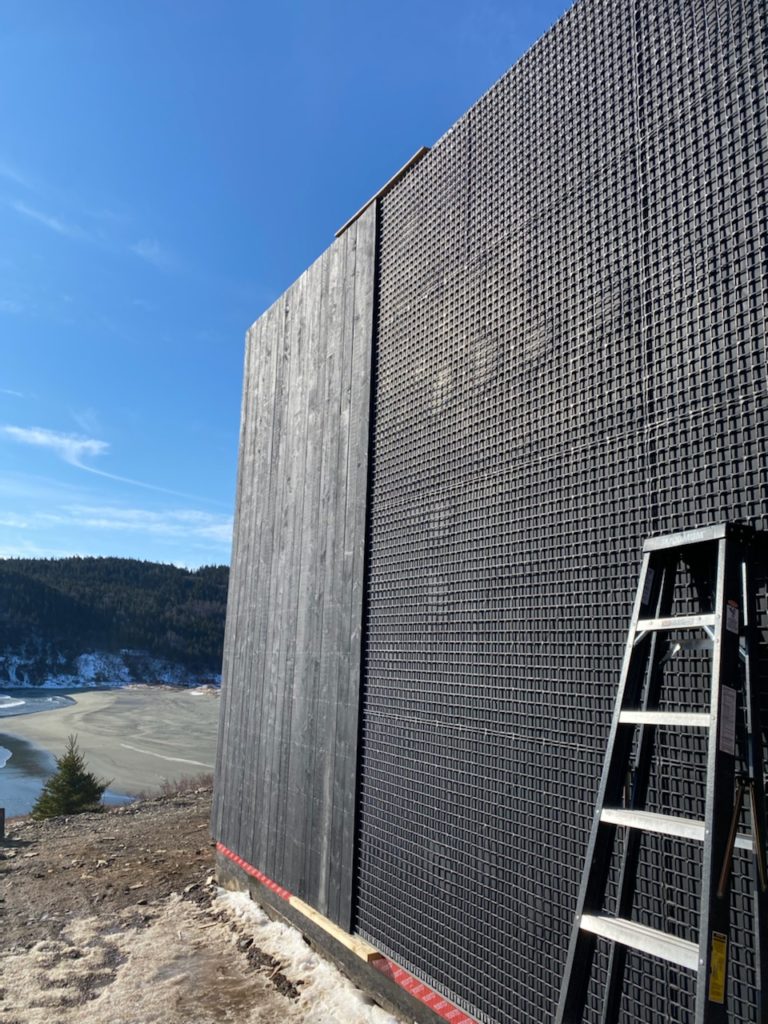
VentGrid is a product developed in Nova Scotia and manufactured in Ontario. It is made from 100% post-consumer/industrial recycled plastic and comes in 4×8 foot sheets. It essentially a 2 x 2” grid with nodules at every four inches that stand the grid off the substrate by ¼”. The nodules are pre-formed (molded) with countersunk holes for screw attachment.

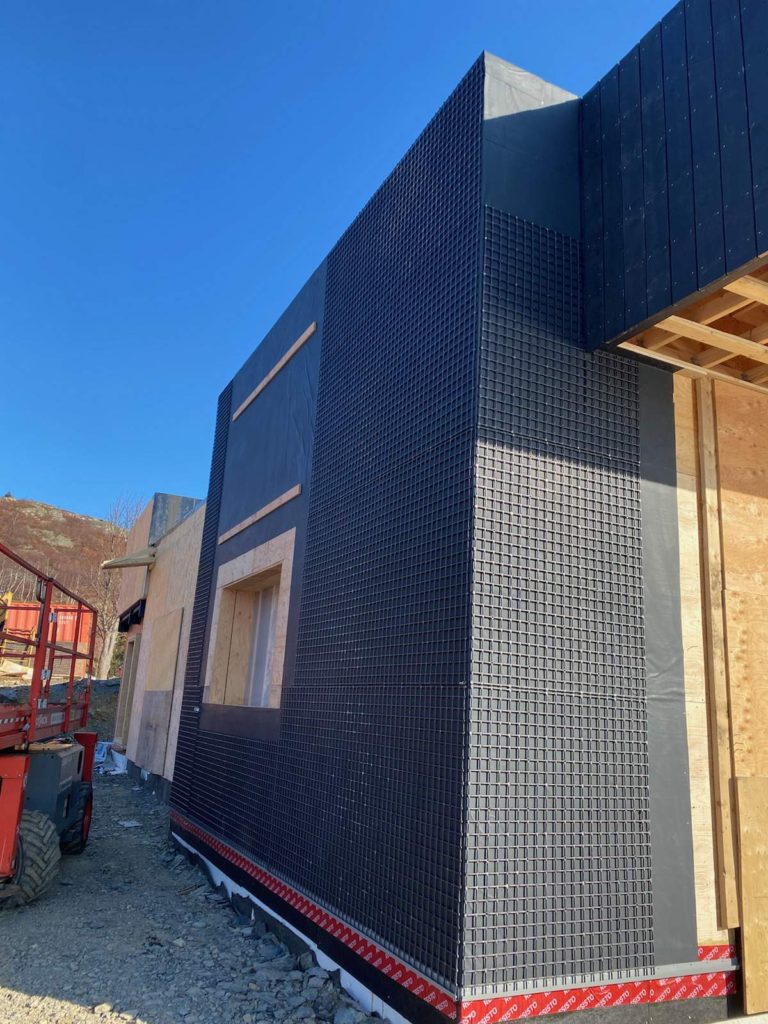
I have to say that I am very impressed with this product! It is relatively economical, but more so when you take into account that it can be installed in less than half the time it takes to install strapping, and it offers continuous support. It can be cut simply with a pair of wire snips. Most importantly for me, it is ideal for installing siding vertically. Vertical siding is problematic in that the strapping must be installed horizontally – which defeats the drainage cavity, leading to premature failure from rot.
I cannot understand why VentGrid is not being used for wood siding and cedar shingle installations in this province! It sells very well in the Maritimes – most Kent stores carry it there. As I say, the only drawback is that it cannot be installed over extruded Styrofoam.
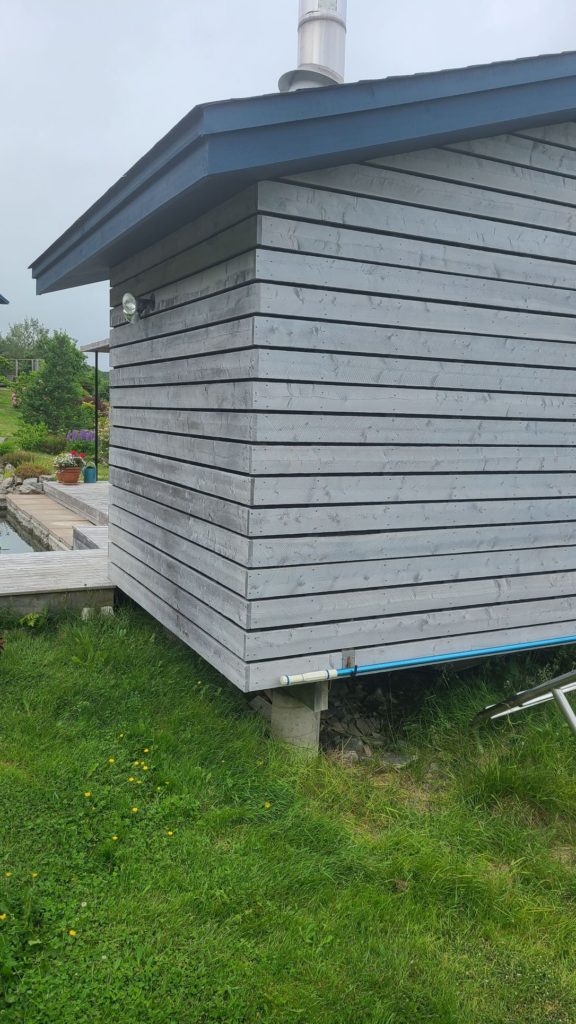
Finally … my wife and I agonized over the final exterior finish. We wanted something that was as maintenance free as possible because … well … we’re not getting any younger. We looked at commercial composite boards manufactured from concrete, but the cost was outrageous and the product was not particularly sustainable. In the end, we arranged for central Newfoundland fir to be brought to our local sawmill, only five miles away from the construction site. The logs were cut into ¾ x 6” rough boards. The boards were then brought to the contractor’s warehouse, where, over the winter, they were air dried on racks, and cleaned of sawdust / chaff. Then they were stained (all sides and edges) and permitted to dry thoroughly before being returned to site. Because the boards are rough sawn on all sides and edges, the stain really penetrates into the wood.
My contractor concluded this was a crazy scheme! The boards were never kiln dried or seasoned to any great extent. I explained that most of the (kiln-dried) corner boards and trims on my former summer home, had rotted out completely inside of twenty years and the clapboard was on its third or fourth coat of stain.
However, the rough open board cladding that I had used to finish my outbuildings had been in place for fifteen years and had never needed any maintenance whatsoever. I had used rough boards nailed horizontally over strapping. Both the strapping and the aspenite sheathing had been fully coated with a trowel-on air barrier (Air-Bloc by Henry). The gap between each board was ¾”.
Seeing is believing, and I had a (somewhat nervous) convert. But what could be more sustainable for building here than what the old-timers used to call “snotty var”?
There’s also the contribution to the local economy!
We did a test board and left it exposed for the entire winter, facing south. We applied various sample stains to test for colour and extent of protection. Eight months later the test board was very useful for both. But the most amazing thing was that wherever the board was exposed (not stained) the surface was checked and cracked. Where stained, the boards were in excellent condition. Some cupping and checking is still expected, but we are not anticipating this to any significant degree.
We decided on a ¼” open gap everywhere. (The air barrier manufacturer recommends a maximum open joint width of ½” for vertical joints.) The intent is that (to the extent possible) every piece of board siding is free floating, but UV exposure is minimized. There are no interfaces or butt edges. There is no caulking. There is nothing to hold water through capillary action (like where clapboard overlaps) and the entire system is free draining. Even after a prolonged weather event, the boards and cavity dry out in just a few minutes.
Our local boards are simply a screen. No attempt is made to surface seal, as this is impossible to achieve in our climate anyway. Far better to recognize the natural forces that drive rain penetration and to address them all individually. A second coat of stain will be applied over the entire installation once the siding is complete. This will add extra protection to the exposed face and hide the galvanized spiral nails that have been used for attachment.

Finally, you may wonder about our choice of colours: dark gray and white. Looking out at the islands in the cove we found our inspiration: shale with marked quartz veins.

We wanted the house to look like an outcrop. But having made the choice long ago, we continue to find examples to reinforce our colour selection.

Next post: windows and doors. (Fenestration.) That will be interesting!
I can’t imagine the hours/months of research you put into that house!
The hardest thing Scarlett, is deducing how much of that I actually got right!
I’m betting on 95%!
Very interesting. I hate living in a neighbourhood that is a sea of vinyl siding. When I was 12-13 my Dad had a house built in Port Aux Basques (1982-83). I remember helping him install Tyvek in the PAB wind. He finished it off with vertical T&G cedar siding from British Columbia. What a smell! No other house like it in the town.
In Port-aux-Basques you know about wind!! I once saw a concrete paver lift on Rose Ting’s fish plant! There is an interesting product made by Certainteed called Cedar Impressions polymer shakes and shingles. I haven’t used it, but have heard good reviews. https://www.certainteed.com/siding/shake-and-shingle/
Not sure what the cradle-to-grave emissions cycle is like. I’ll have to read up on that.
Thanks for another interesting update. Your comment about using the VentGrid vs horizontal strapping makes a lot of sense for both individual and contractor. I’m surprised Kent doesn’t carry it here. (perhaps it does by now??)
Hard to say. My experience here is that the distributer is not much of a “go-getter” shall we say. (Nothing to do with Kent.) I purchased the product from Kent in Bathurst NB and had it trucked down!
Been enjoying the blog…. just saw this and wanted to post it – I had forgotten about Amory Lovins…
https://www.theguardian.com/environment/2022/mar/26/amory-lovins-energy-efficiency-interview-cheapest-safest-cleanest-crisis
Just a note to let you know how appreciated the blog is. Innovation in building is important, and this is a great inspiration. Appreciate all the ideas.
That’s very kind of you Harold.